Do you know everything about how to effectively set up your Google Analytics account?
If you do, great and fantastic to hear! You are an Analytics Ninja right? :-)
If you don’t, this is a great chance to dive a bit deeper into the world of Google Analytics.
And to get really up to speed with all the possibilities that are out there.
In this very detailed post I share the 31 steps you need to take into account to correctly set up and configure your Google Analytics account.
So that you collect the most relevant, accurate data and insights for your business.
It contains both technical and marketing based tips that are related to the administrator section of your Google Analytics account. Further, this article is fully packed with actionable and additional readings on each subitem.
Three main reasons for sharing this Google Analytics Configuration Guide with you:
- I haven’t found a guide that comes close to this one yet.
- I love to share what I have learned in the past.
- I have challenged myself to write a very long, but qualitative blog post.
Grab an easy chair and enjoy reading!
For your convenience, here are direct links to the main sections in this article:
- Five Steps Analytics Framework
- Google Analytics Account Structure
- Google Analytics Account Set Up
- Google Analytics Property Set Up
- Google Analytics View Set Up
Five Steps Analytics Framework
Let’s start with an overview of five steps you should consider from implementation to optimization.
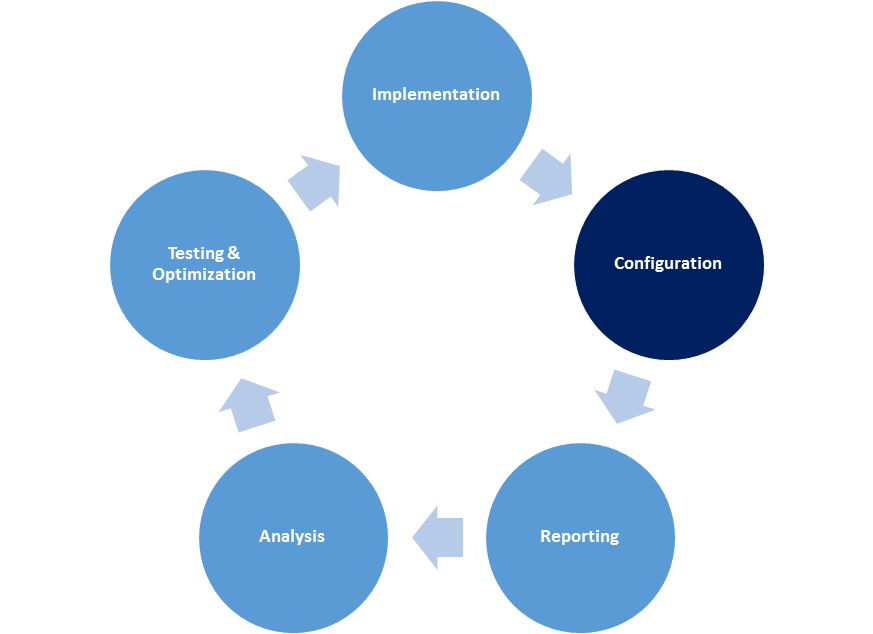
- Implementation: technical set up of Google Analytics to track and measure everything correctly.
- Configuration: set up of all features in a Google Analytics account.
- Reporting: set up of your custom reports and dashboards to monitor how things go.
- Analysis: analysis of the performance of your traffic channels and website.
- Testing & Optimization: A/B tests and other optimization efforts to improve the performance of your website.
I have talked about the Google Analytics implementation in the past. Now it’s time to dive into the configuration part.
Installing your Google Analytics tags correctly is a must and a good start.
Keep in mind that you need a proper set up of your Google Analytics account as well if you want to get the maximum out of your Google Analytics data!
Google Analytics Account Structure
Each Google Analytics account is linked to at least one property. And each property is linked to at least one reporting view.
Please see an example below:
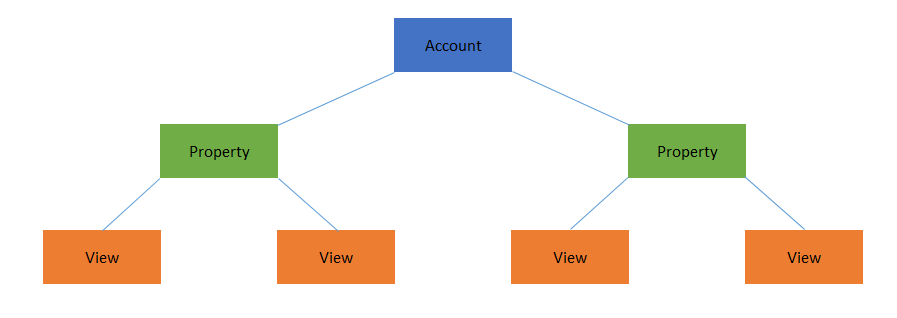
- Number of accounts per Google Analytics account login is currently limited to 100.
- Number of properties per account is currently limited to 50.
- Number of views per property is currently limited to 25.
Contact Google if you (are an agency and) require higher numbers.
But do you really need it?
I have seen too many accounts with lots of properties and views that are not actively used or collect useless data.
Tip: you can set up user permissions on the account, property and view level.
Google Analytics Account Set Up
1. Account Settings
The account settings page is the first item that shows up in the admin interface.
There are two easy ways to retrieve your account ID:
- You can find it on the account settings page.
- It is shown in the URL when you are logged in to your Google Analytics account. Example: https://www.google.com/analytics/web/?hl=en#management/Settings/a50199940w82132191p85051646/.
In this case the account ID equals 50199940.
On this page you can:
- Change your account name.
- Choose your data sharing settings (on what level do you like to share your data with Google?).
- Review and accept the data processing amendment.
- Delete your Google Analytics account.
Main takeaways:
- Take your time to set this up in the most appropriate way.
- Read this article if you are concerned about data safety.
2. User Management
The larger the number of users within your organization, the more important this feature is going to be.
You don’t want every employee to have the rights to edit and delete stuff in your Google Analytics account.
First of all you need to understand the different user access levels:
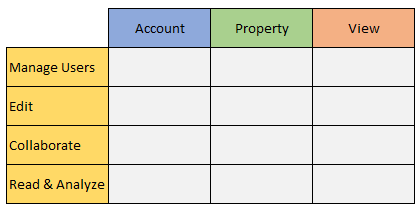
Four permissions are available:
- Manage Users: Can manage account users. Does not include Edit or Collaborate.
- Edit: Can perform administrative and report-related functions (e.g., add/edit/delete accounts, properties, views, filters, goals, etc., but not manage users), and see report data. Includes Collaborate.
- Collaborate: Can create personal assets and share them. Can collaborate on shared assets e.g. edit a dashboard or annotation. Includes Read & Analyze.
- Read & Analyze: Can see report and configuration data; can manipulate data within reports (e.g., filter a table, add a secondary dimension, create a segment); can create personal assets, and share them, and see shared assets. Cannot collaborate on shared assets.
A few things to note here:
- If you give someone a base permission on the account level, this permission is also set on the property and view level. For example if you give Peter Edit rights on the account level, you cannot lower them to Collaborate on the view level.
- The same counts for property rights in relation to view rights.
Here is an easy way how you can control the individual user permissions from the account tab:

After you click on User Management (Account level), you can click on a user’s email.
Doing so results in the following screen:
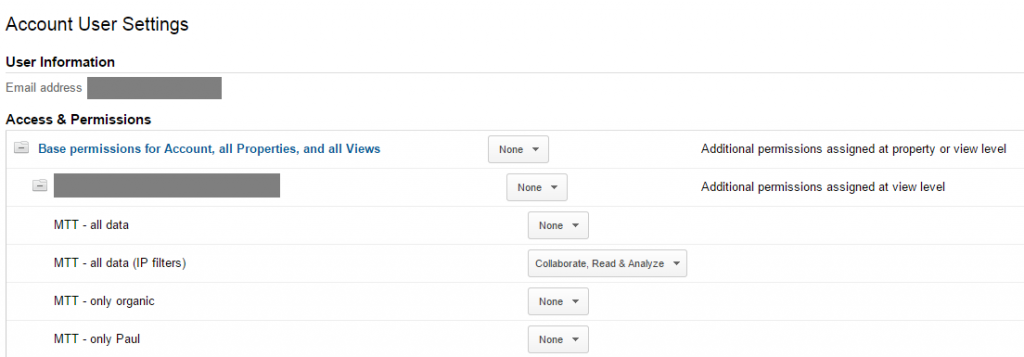 This is great! Now you have full control over the permissions of this individual user on the account, property and view level.
Two more things to mention:
- You can only add email addresses that are registered with a Google account.
- You can notify new users by email.
Main takeaways:
- Take user permissions very seriously(!).
- Don’t provide higher access levels to someone than is necessary.
- Only provide Edit rights to experienced people in your organization.
- Remove users who shouldn’t have access anymore.
3. All Filters
Filters are extremely useful in Google Analytics. They help you to control the data being stored in your reporting views.
On the account level you can build new and change or delete existing filters. Besides that you can choose on which reporting views the filters should be applied.
There are two filter types (predefined and custom):
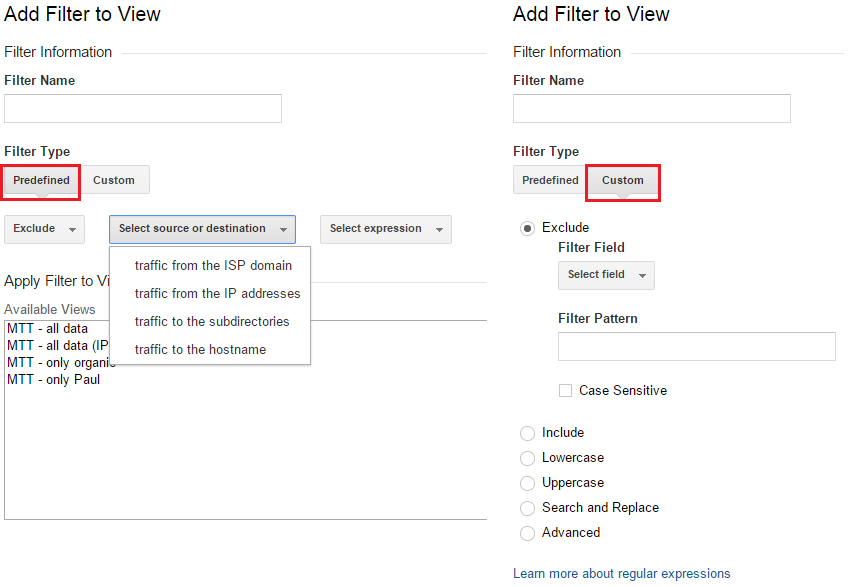 Predefined filters allow you to filter on common things like:
- Exclude company IP addresses.
- Exclude specific hostnames.
Custom filters allow you modify the data that is actually collected in a lot of different ways.
I recommend to read my guest post on Google Analytics filters on Online-Behavior.com if you want to learn more about this specific topic.
It explains everything you ever need to know on this topic.
My in-depth guide on regular expressions will come in handy as well. Regular expressions are very important in the Google Analytics account set up process.
Main takeaways:
- Learn regular expressions first; this will be a huge help in building powerful filters.
- Test your filters in a separate view first; there is no way back.
- Always keep an unfiltered raw data view.
- Use filters for long-term segmentation purposes.
- Use segments for ad-hoc analysis.
4. Change History
The Change History overview provides a record of activities over the last 180 days.
Please see and example below:
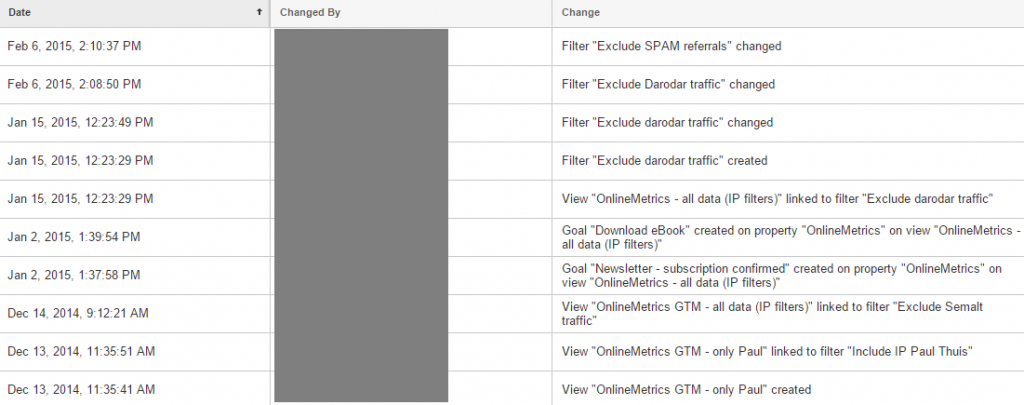
- Date: date and time of the activity.
- Changed by: email address of Google Analytics user who performed the activity.
- Change: all details about the activity.
You can filter (A to Z or Z to A) on each column of data. And there is a search box to seach on a particular term.
The “Change History” feature brings context to another level. It helps you to understand settings changes – which often affect the data – even if they were not documented elsewhere.
Main takeaways:
- Check this tab at least once every month.
- Copy and export the data to another environment (Excel) at least every 180 days – to prevent losing this data.
5. Trash Can
The trash can was introduced at the beginning of 2015 and can save you from a lot of pain.
 If you accidentally remove a Google Analytics account, property or view, you can restore it within 35 days. This is especially helpful if relatively a lot of people have edit rights and the chances of something going wrong with your data grows.
Main takeaways:
- You need edit permission to access the trash can.
- The user who marked an entity for deletion is shown next to the entity.
- When you restore an account, property or view from the Trash Can, all settings and configurations are preserved.
- Data is not processed while an entity is in the trash can.
- After 35 days the entity is lost and cannot be restored
Well, I hope you don’t have to use it, but it might come in handy at a certain point in time.
Google Analytics Property Set Up
6. Property Settings
Like I already explained, a Google Analytics property is connected to a Google Analytics account.
In the property settings there are quite a few things to set up.
The basic things include:
- You can look up the tracking ID.
- You can edit the property name.
- You can set the default URL and View.
- You can select the best fitting industry for your business.
- You can delete the property.
Then, if you hit the advanced settings link you see:

Select this option to allow your manual URL tagging to override AdWords auto-tagging.
Please make sure you know what you are doing if you select this option!
Simply refrain from selecting this option if you are unsure about the technical impact.
You might be interested in reading my campaign tracking guide as well.
Advertiser Features
This features allows you to optimize the website experience of your visitors in a much deeper way. And not the least, to earn a bit more money. :-)
By setting up this feature you enable Demographics and Interest reporting, Remarketing, GDN Impression Reporting, and the DoubleClick Campaign Manager integration.
Read this post on Google Analytics Demographics & Interests Reports if you want to learn more about this feature.
In-Page Analytics
Enhanced link attribution might be a powerful feature in these three cases:
- There are multiple links on a page that all have the same destination.
- There is one page element that has multiple destinations.
- There are many buttons, menus and other javascript actions you need to track.
Here you can learn how to set up enhanced link attribution.
Webmaster Tools Settings
Last but not least, Webmaster Tools.
I recommend every webmaster to set up Webmaster Tools.
Connecting Google Webmaster Tools to your Google Analytics account, provides you with tremendous, additional insights for free.
You need to be the owner of a verified website in Webmaster Tools to make this work.
First log in to Google Webmaster Tools and make the connection as shown below:
 There is also the option to set this up directly through the Google Analytics interface.
The last step includes selecting the view (profile) you wish to connect to Webmaster Tools.
After you have finished this step you can find the reports below the AdWords reports in Google Analytics:
 Main takeaways:
- Start with defining the basic property settings.
- Always set up and connect a Webmaster Tools account; there is a wealth of extra knowledge you dont’want to miss.
- Advertiser Features and In-Page Analytics are optional, but in some cases very useful.
- Ask you tech guy or woman if you need some help here!
7. User Management
I have already talked about this item from an account level point of view.
There are two differences if compared to the account level:
- You cannot click-through on an email address and arrange the permission from there.
- From here you can only grant access on the property level.
Takeaways:
- In my experience it is the most easy to grant new users access from the account or view level tab.
- If you want to change access of a particular user, it’s most easy to do this on the account tab.
- Once again, be careful with user permission levels; for a lot of people Read & Analyze access will do.
8. Tracking Info
Like the name already implies, this tab contains settings directly or indirectly related to tracking.
Tracking Code
Here you can find the univeral tracking code you need to install on all pages of your website.
You can also find the current status of your tracking code: receiving data is working correctly or not (yet).
Implementing tracking codes works a bit differently if you work with Google Tag Manager or another tag management system.
It is beyond the scope of this article to explain about Universal Analytics in relation to GTM.
Keep in mind that you just have to provide the “UA-code” in GTM to get things up and running up.
Some additional information on PHP and Dynamic Content Implementations is provided here as well.
If needed, work together with your webdeveloper to set things up in the correct way.
User-ID
Simply said the user-ID helps you to track website users accross multiple devices and browsers.
It sounds like paradise, but in reality it isn’t that easy to set this up.
For many website owners it is impossible to get this to work. You need specific information from your website visitors first before you can collect useful data.
The process looks as follows:
- Review and agree with the User-ID policy.
- Set up the User-ID
- Create a User-ID view
Interesting readings if you want to know more:
- Universal Analytics User-ID: Setup Guide by Distilled
- Guide to Cross Device Tracking with User-ID in Google Analytics by Optimize Smart
I recommend to only use this feature if you are an experienced Google Analytics user.
Session Settings
Here you can change two default settings:
- Session timeout: 0 hours and 30 minutes.
- Campaign timeout: 6 months.
The session timeout range = 1 minute (MIN) to 4 hours (MAX).
The campaign timeout range = 24 months (MAX).
I haven’t barely touched these numbers in most Google Analytics accounts.
If – for whatever reason – you like to change the session timeout default setting, please read this article first:
Conversion handling is something to keep in mind when changing the campaign timeout setting.
In the last cookie counts model, the last channel get’s the conversion. Direct traffic cannot overtake the conversion from another marketing channel.
If you change this setting, it might influence the way conversions are attributed in the standard model. And there could be some more “side effects” if you make radical changes here.
Two cases when you want to consider making changes to the default settings:
- If your site automatically signs a user out after a certain amount of time. You might want to set the session timeout to match this period.
- If you are running different micro campaigns in the upcoming days. Clicks on these campaigns might be relevant for just a few days. In this case you can think about shortening the campaign timeout time.
Please be careful with (temporarily) changing these settings. It impact the overall numbers. So don’t change it without a good reason.
Organic Search Sources
Only if you work with analytics.js you can add extra organic search sources on top of the default list:
If you want to get your data the most accurate, it is recommended to add a few search engines to this list.
This is especially useful if your site receives loads of organic traffic and traffic from images through images.google.com.
Please see an example below:
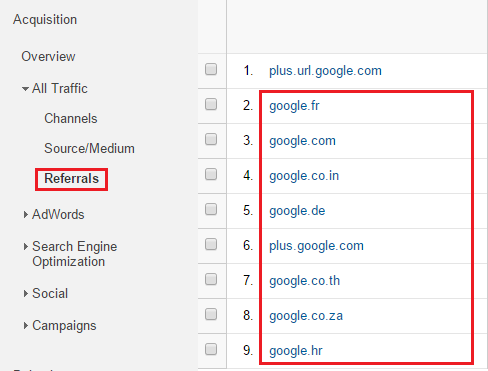 These are all sources coming from image search.
I recommend to read this article about how to customize organic search sources if you want to learn more about this topic.
Referral Exclusion List
There is a lot of debate and confusion around this topic.
I have seen many cases where it doesn’t work the way people thought it would work.
Here is my take on this:
- A referral automatically triggers a new session.
- Adding a referral to this list makes a user arrive via this referral not to be treated as a new session.
- Carefully think about which referral to add and which not.
If you want a detailed technical read on this topic, this article is highly recommended to read.
I have written an article about self-referrals in Google Analytics. You should check it out as well.
Search Term Exclusion List
This feature comes down to counting some of your organic search traffic as direct traffic instead.
It comes in handy if you like particular brand terms or your company name not to count as organic search traffic.
However, as far as I know it doesn’t affect the (not provided) data.
You can read this discussion on Stackexchange.com
Since this (not provided) percentage is already between 90 and 100% (for Google searches) this feature is not really worth it for the Google traffic.
You can still consider it if you have a lot of remaining searches via Bing and Yahoo.
Main takeaways:
- Installing the basic tracking code correctly is a must for accurate data.
- In many cases you don’t need to set up or modify User-ID, Session Settings, Organic Search Sources and Search Term Exclusions.
- Judge your domain structure and data in relation to setting up a Referral Exclusion List.
9. AdWords Linking
Are you running AdWords campaigns? It’s a must to connect your AdWords and Analytics account.
And it is actually very easy to do this in the correct way.
This page shows you the most up to date information on how to connect AdWords to Analytics.
Most important benefits:
- Create remarketing lists in Analytics to use in AdWords.
- Import your click and cost data and view it in relation to engagement and conversion metrics in Analytics.
- Import Google Analytics goals and transactions in AdWords and view website engagement data as well.
Google Analytics is continuously rebuilding the report structures. So that you can get the most relevant data within one screen.
Of course you can always customize your reports to fit your specific needs.
Main takeaways:
- Always connect Google Analytics and Google AdWords if you are an advertiser.
- Even if you are not an advertiser it is useful to set up an AdWords account.
Your AdWords account gives you access to a brilliant Keyword Planner:
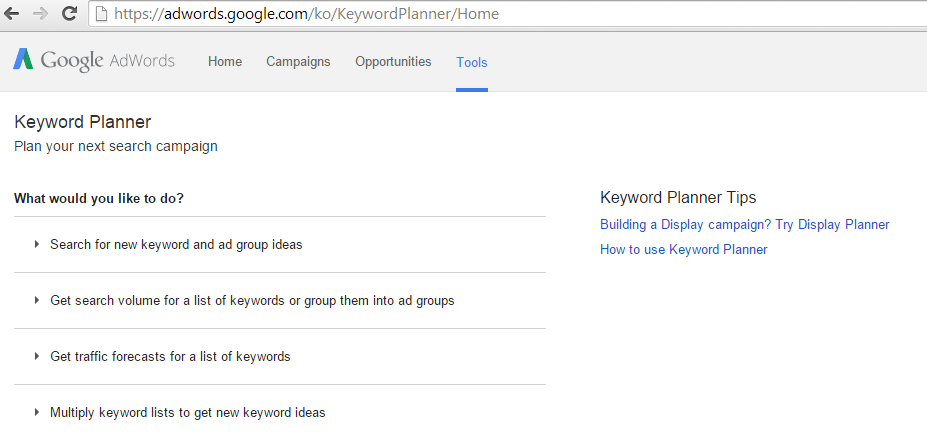 It definitely can be a great help in finding good keywords to target (organically) and as part of your navigation structure.
I have written an in-depth guest post on SEMrush on keyword data you might want to check out later.
10. AdSense Linking
Your AdSense reports give you already quite a few metrics to judge upon how you are doing.
However, there is a wealth of extra knowledge if you connect AdSense to Google Analytics.
It is very easy to do this:
- Log in your AdSense Account.
- Click on Settings button (upper right corner).
- Click on Access and authorization (left side)
- Click on Google Analytics integration (left side)
Now you have the option to connect your AdSense account to one Google Analytics account.
 Two posts you should read:
Main takeaways:
- At the very least connect your most important AdSense and Analytics account.
- Optimize your AdSense performance with AdSense and Google Analytics reporting.
- Set up an AdSense dashboard or custom reports to work efficiently.
11. All Products
Here you can find all about Google Analytics Product Linking.
Links you could set up on your own:
- Webmaster Tools
- AdSense
- AdWords
There are of couple of products where Google can assist you in the linking process:
- BigQuery (only applicable to Google Analytics Premium Users)
- DoubleClick Bid Manager (only applicable to Google Analytics Premium Users)
- DoubleClick Campaign Manager (only applicable to Google Analytics Premium Users)
- DoubleClick Search
Main takeaways:
- In my opinion a Webmaster Tools integration is a must.
- Set up an AdWords account for keyword research goals as well.
- If applicable connect your AdSense to Analytics account.
- The other products are most often only applicable to big advertisers.
Useful article: Ultimate Guide to Google Analytics Integrations.
It explains about the following integrations: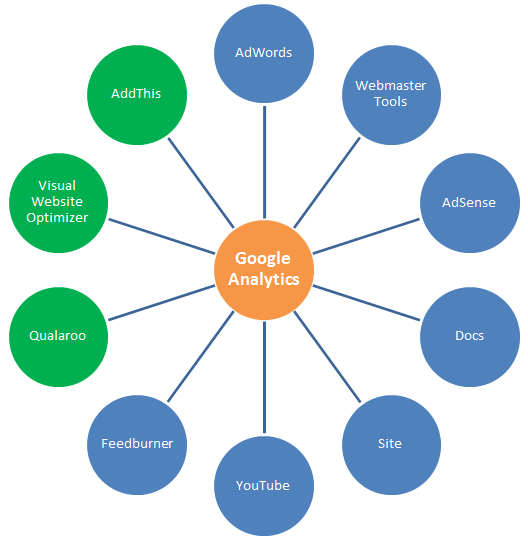 Daniel Waisberg published a great book on Google Analytics Integrations in May 2015. Check his book on Amazon.com.
12. Remarketing
Remarketing in Google Analytics is an extremely powerful feature.
There are a couple of prerequisites to consider:
- You need to have an active Google Analytics account.
- You need to agree to the Google Analytics terms of services and Advertiser Features Policy.
- You need to update your privacy policy.
- You need to enable Advertiser Features.
- You need to have a linked AdWords or DoubleClick Bid Manager account.
Remarketing is known to convert really well and enabling it via Google Analytics offers a lot of extra options.
Three useful Remarketing Audiences to consider:
- People who have at least spent X seconds (e.g. 30 seconds) on your website
- Google Smart List
- People who have visited the first step of your sales funnel
There are a lot possibilities here. Think about your website, business, Google Analytics stats and I am sure you will come up with some great ideas!
Then there is also the option to set up dynamic Remarketing.
Read these articles to learn more about this topic:
- About Dynamic Remarketing
- Setting Up Dynamic Remarketing via GTM
- Google Integrates Dynamic Remarketing Campaigns With Google Analytics
Main takeaways:
- If you are an advertiser you definitely need to consider Remarketing with Google Analytics.
- Start with a few audiences, see what works and expand upon.
13. Custom Definitions
Custom definitions consist of metrics and dimensions that you have created by yourself.
Creating a custom metric or dimension is a two step process:
- Set up the custom metric or dimension in your property
- Modify your tracking code
You can set up a custom dimension at the hit, session, user or product level.
Custom metrics can fall in one of these categories:
- Integer: can be any number.
- Currency: match the view settings, a decimal number.
- Time: specify time in seconds.
Remember that custom dimensions and metrics can’t be deleted once created. However, you are able to manage and edit them in the custom definitions settings.
Suggested readings:
- Create and edit custom dimensions and metrics
- Defining audiences with Google Analytics custom dimensions
- Complete guide to custom dimensions in Google Analytics
Main takeaways:
- You can segment your data on any dimension that matters to your business.
- Set up custom metrics that are in line with your online business objectives and KPIs.
- You might need an experienced developer to make necessary tracking code changes.
14. Data Import
You might run a simple business that is not connected to multiple tools and systems other than Google Analytics.
On the other hand, if you have CRM data, Ecommerce data and Analytics data, I recommend to create a single comprehensive overview of your business.
This is when you want to use the data import feature in your Google Analytics account.
Types of Data
You can important three different data types:
- Hit data import (Ecommerce refund data)
- Extended data import (user data, campaign data, geographical data, content data, product data, custom data)
Data import works by uploading text files to a Google Analytics property. This can be done in the Google Analytics interface or by using the Google Analytics Management API.
Main takeaways:
- Use this data import feature if you have lots of external data that matters to your business.
- Imported data can either use default or custom dimensions or metrics.
- Imported data can be used in reports, remarketing audiences and other Google Analytics tools.
15. Social Settings
Until now I have not used the social settings feature in any client’s configuration.
The configuration affects how Google Analytics collects social activity data for your web property.
You might want to use this feature in one of the following cases:
- You have multiple web properties under a single domain of a larger site.
- You want to eliminate unwanted social activity from unrelated domains.
- You want to include missing social activity.
I recommend to read this Google Analytics help article if social settings and measuring social activity in Google Analytics is important to you.
Google Analytics View Set Up
16. View Settings
When you set up your first Google Analytics account, you will notice that one property is connected to one data view.
However, for different reasons you might want to set up more data views.
For example, you don’t want everybody to have access to all data. Or you want to avoid sampling and use a filtered view instead of a segment.
Each data view includes the following basic settings:
- View ID (cannot be changed)
- View Name (use naming conventions and logical names)
- Website’s URL (just fill in the right URL of your website; a wrong URL doesn’t affect the data collection process)
- Time zone country (time zone of where you are located)
- Default page (only fill in if you have another URL than your default homepage URL that is pointing to the same page; in that case fill in what comes after your hostname beginning with a slash “/”)
- Exclude URL query parameters (add one or more query parameters that you want to filter out of your data; be careful not to exclude parameters that are important to your data analysis)
- Currency displayed as (specify the currency that you want to display in your reports)
- Bot Filtering (mark this option if you want to exclude known bots and spiders; my advice is to test it first in a different view)
- AdWords account linked to this view (useful for linking AdWords data at the view level)
- Site search tracking (must use if you have a site search function on your website)
- Query parameter (add the query parameter that is attached to your site search keyword; tick the box if you want to strip the site search parameter from the URL that is shown in Google Analytics)
- Site search categories (tick this option if your site search function is using categories; specify them with a query parameter as well)
Main takeaways:
- These basic view settings are very important to get your data right.
- Not excluding query parameters can lead to thousands of different pages in Google Analytics, even for small websites (in reality there are far less unique pages).
- It is possible to copy your view (with all settings) and make some modification where needed.
17. User Management
I have already talked about this item from an account and property level point of view.
There are two differences if compared to the account level:
- You cannot click-through on an email address and arrange the permission from there.
- From here you can only grant access on the view level.
Takeaways:
- In my experience it is the most easy to grant new users access from the account or view level tab.
- If you want to change access of a particular user, it’s most easy to do this on the account tab.
- Once again, be careful with user permission levels; for a lot of people Read & Analyze access will do.
18. Goals
In my opinion, goals are a key part of your Google Analytics account set up.
There is an option to create a new goal or import one from the gallery. I recommend not to use the import function since it lacks well-defined goals.
Google Analytics allows you to:
- Create 20 different goals
- Different goal types (destination, duration, pages/screens per session and event)
- Verify your goal set up before you save it (very handy!)
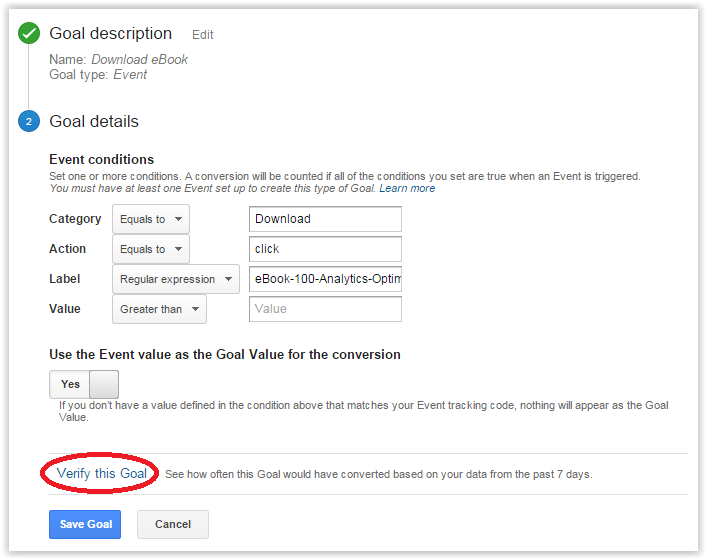 I recommend to check out my earlier posts on goals if you want to learn more about this neat feature:
- How to effectively set up goals in Google Analytics
- Goals vs. Ecommerce transactions
- Macro and micro goals
Main takeaways:
- Set up goals for your main conversions, but minor conversion points as well.
- Make sure to verify your goals first.
- Use the first goal spots for your most important goals.
- Set up custom alerts to make sure you are immediately alerted if your tracking is broken.
19. Content Grouping
Content is king. Probably you have heard this statement many times before.
Content marketing can be the driver of your business growth.
Today the amount of content that is created on the web is massive. Measuring that content can be a real challenge. That’s where Google Analytics Content Grouping can be a huge help.
On default, Google Analytics measures every single page separately. And there is nothing wrong with that.
However, if you want to analyze particular categories of content on your website, content groups are a fantastic solution.
Edit rights are required to set up content groups.
Currently you are allowed to set up five different content groups.
Here is how it visually looks like:
 Three Ways to Set Up Content Groups
You have three different options when setting up your content groupings. Choose the option(s) that fit your website structure, technical know-how and general preferences best.
1. Group by Tracking Code
It requires you to add a small piece of code to each page on your site.
When you modify your tracking code, you set an index number (1-5) to identify the Content Grouping, and you use a group name to identify your Content Group:
analytics.js (Universal Analytics)
ga(‘set’, ‘contentGroup<Index Number>’, ‘<Group Name>’);
ga.js (Classic Analytics)
_gaq.push([‘_setPageGroup’, ‘<Index Number>’, ‘<Group Name>’]);
Example for content grouping for soccer and category men. You want to set this group at index number 1.
analytics.js: ga(‘set’, ‘contentGroup1’, ‘Men’);
ga.js: _gaq.push([‘_setPageGroup’, ‘1’, ‘Men’]);
It requires basic technical skills to set this up. Please read this article by Simo Ahava if you need any help here.
2. Group by Extraction
The extraction method extracts the name of your content groups from an existing dimension of data. You need to use a regular expression here to parse the dimension. As you can see below, you can use the page name, page title or screen name to parse the group details.
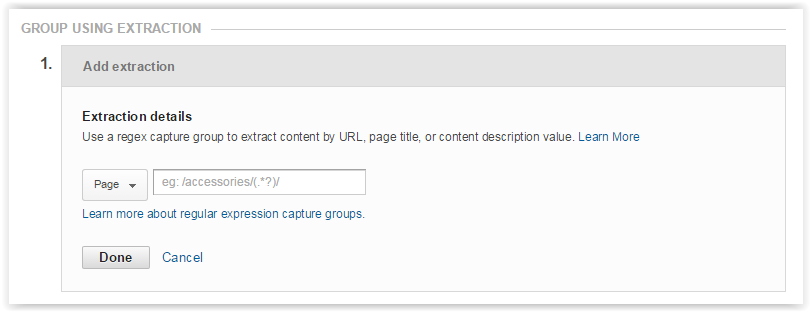 The structure of your website and different naming conventions are key to whether this method is a good option for you or not.
You should also take into account that any new content that does not fall in an early defined category requires you to update the settings. And that can be a huge pain!
3. Group by Rules
This method is very similar to the extraction method. The only difference here is that you have to manually name the group. The value of the name is not automatically extracted from a particular dimension of data.
It doesn’t require any coding to get this to work. However, if you add any new content in the future, don’t forget to update your Google Analytics settings.
Here is another practical article about content groupings (by Justin Cutroni) that I recommend to read.
Main takeaways:
- Content groupings are very useful to structure and analyze your content in a proper way.
- There are three main ways to set this up.
- Technical skilled people/organizations should in most cases use the “group by tracking code” method.
- It you lack technical skills, you can go for option 2 or 3.
- Don’t forget to update your setting if needed (!)
20. Filters
In chapter three of this document I already explained about filters in Google Analytics.
Besides setting up filters at the account level, it is also possible to do this at the view level.
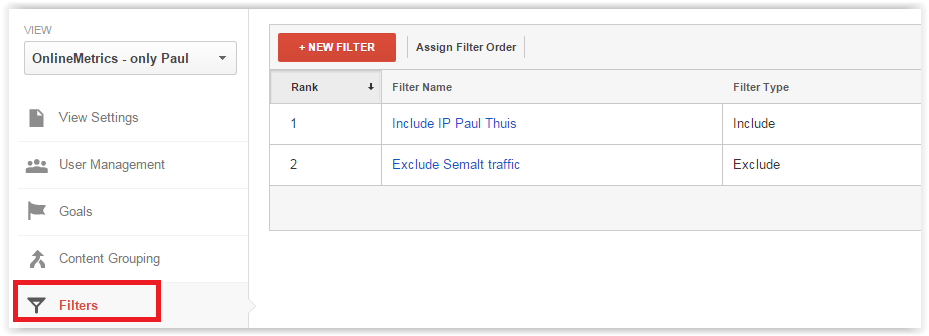 At the view level, you have three options:
- Assign filter order (via ” assign filter order” link)
- Create new filter (via “new filter” link)
- Apply existing filter (via “new filter” link)
1. Assign Filter Order
In general, the first option is only used by those who have advanced knowledge of filters.
The higher the number of filters you apply to your data, the more important this setting becomes.
The filter order determines the order in which the filters are processed. And sometimes one filter influences the working of the next filter.
So be careful and don’t go too crazy if you are in doubt about the interaction between filters.
2. Create New Filter
Via this link, like you saw before, you are able to create new filters.
Take into account that you need to have edit rights on the account level to create filters on the view level.
The more complicated your account is, the more it is recommended to create new filters on the overall (account level) view.
3. Apply Existing Filter
Let’s assume you have created many different filters on the account level. And after that you want to select the appropriate filters for each of your views.
In that case you can use the ” apply existing filter” option in the filter settings.
This is how it looks in Google Analytics:
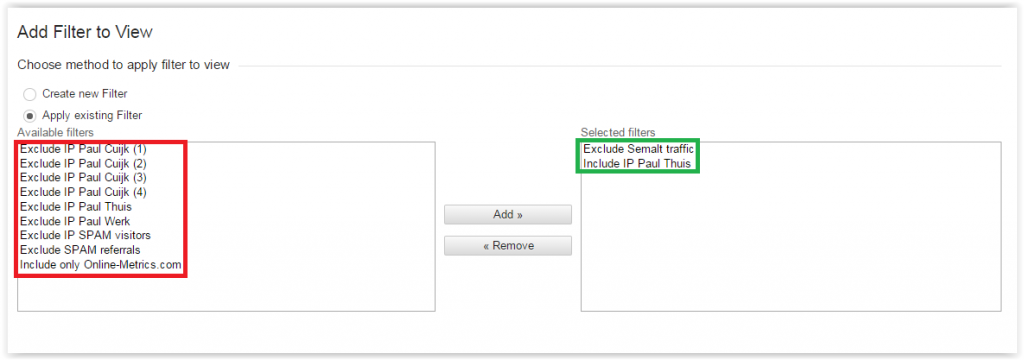 On the right side the already selected filters are shown.
On the left side you can select any more filters that are available (were already set up on the account level).
Make sure to check out this top 10 list about Google Analytics view filters as well.
Main takeaways:
- Learn about regular expressions first; this will be a huge help in building powerful filters.
- Test your filters in a separate view first; there is no way back.
- Always keep an unfiltered raw data view.
- Use filters for long-term segmentation purposes.
- Use segments for ad-hoc analysis.
- Always double check your filter order.
21. Channel Settings
Defining your channels in the correct way is very important. You will mess up your Google Analytics data analysis if you don’t get this right.
As you can see below, there are two things to set up in the channel settings section:
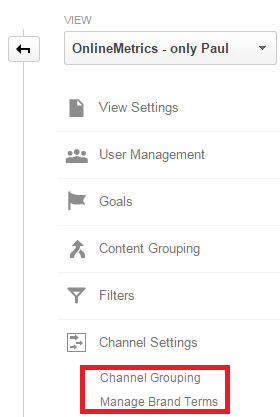
1. Channel Groupings
In Google Analytics most people look at their Google Analytics traffic data via the “source/medium” report.
However, in addition to this you can also review your traffic sources via the channel groupings report.
There is a “default channel grouping” which is ok for basic websites.
However, if you have a lot of different channels that drive traffic to your website, you might want to deviate from the default:
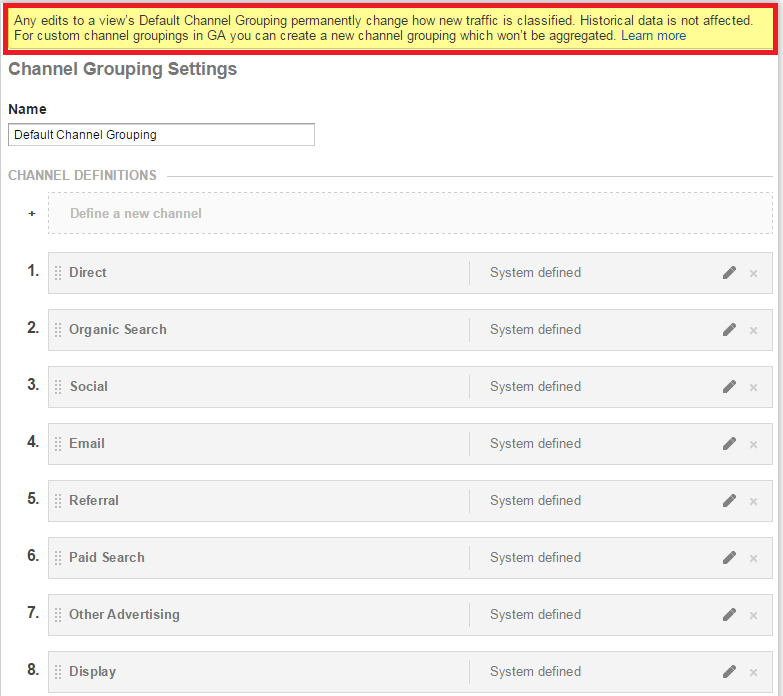 You have the option to either edit the default channel grouping (be careful not to ruin your data!) or set up a new channel grouping.
Here is an example of a channel grouping report:
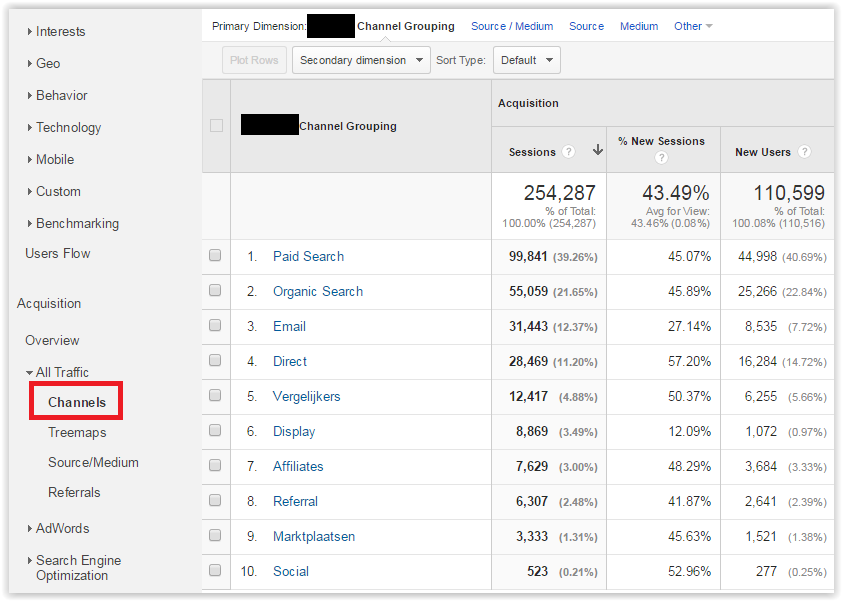 It’s located at Acquisiton >> All Traffic >> Channels.
Don’t forget to use the ” Find Reports & More” section on top to quickly find your desired report or segment.
Please note that you need to set up a custom channel grouping if you want to apply the channel group to your Multi-Channel Funnel reports.
2. Manage Brand Terms
This is a must if you are running paid search campaigns.
Brand keywords tend to have a high CTR, low CPC and a high number of last-click conversions.
Generic keywords tend to have a low CTR, high CPC and a high number of assisted conversions.
Since these keyword groups are connected to different visitor behaviour, it is important to divide this traffic in two separate groups.
This can be easily done in the admin interface:
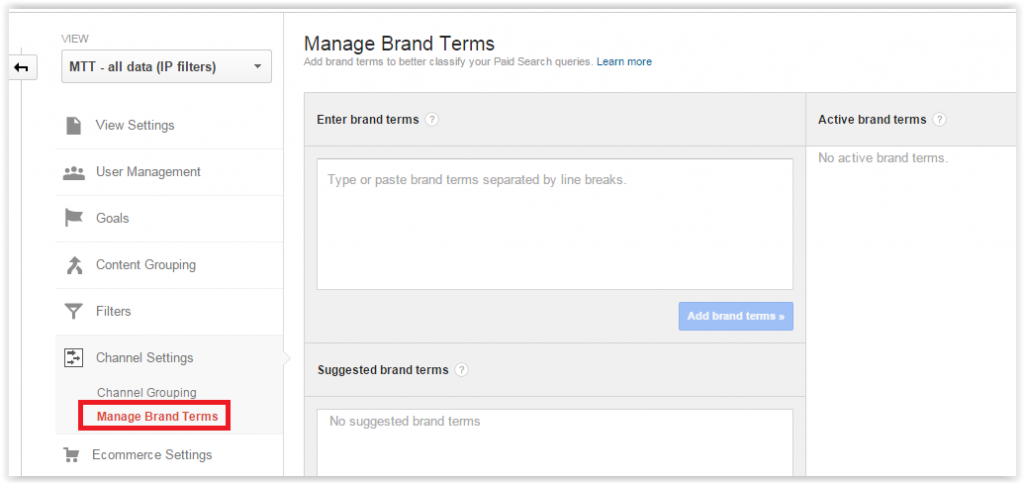 Google Analytics will give you suggestions and in more general terms I recommend to:
- Add terms that people specifically use to find your brand or products.
- Add misspellings.
- Don’t add variations in capitalization.
- Don’t add pluralizations.
Here you can see how it looks like in Google Analytics:
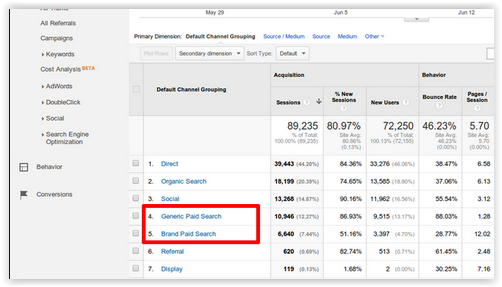 Paid Search is now divided into Generic Paid Search and Brand Paid Search.
Main takeaways:
- You can edit the default channel reporting and build new channel groups as well.
- Channel group modifications are not applied to historical data.
- It can take up to 24 – 48 hours before the new channel group rules work.
- Always segment your paid search traffic into generic and brand terms.
- Set up new channels for each of your (online) marketing channels.
- Default and new channel groupings can only be applied to the Acquisition section of your website.
22. Ecommerce Settings
If you are running a shop, this Ecommerce section is really important to get right.
There are a couple of steps you need to go through to set this up.
First step is to enable Ecommerce and implement the necessary Ecommerce tracking code.
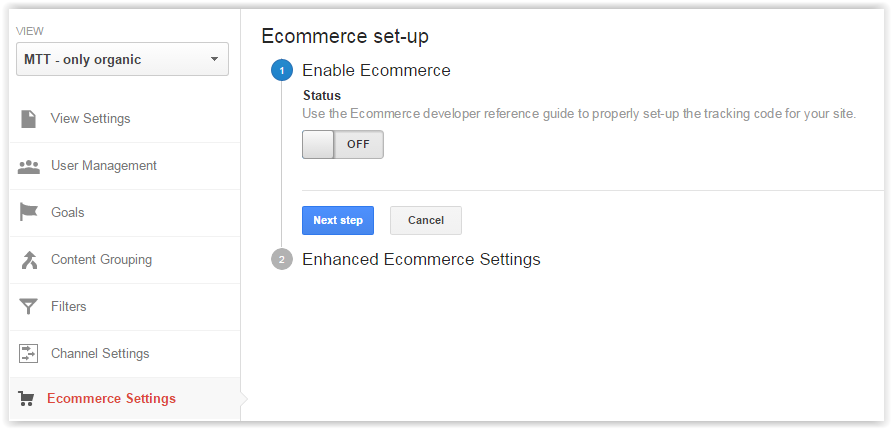 If you have the technical know-how I definitely recommend to implement Enhanced Ecommerce.
Make sure not to implement the Ecommerce and Enhanced Ecommerce library at the same time.
Differences Between Ecommerce and Enhanced Ecommerce
Ecommerce tracking allows you to measure transactions, revenue and a few more metrics that are related to the transaction itself.
Typically, the data is sent to Google Analytics on the “Thank You” page.
Enhanced Ecommerce gives you a lot more flexibility in collecting data.
Besides tracking metrics at the transactional level, it enables the measurement of user interactions with your products as well.
Think about product impressions, product clicks, adding products to basket, initiating the checkout process and even refunds can be tracked!
In short – if correctly implemented – Enhanced Ecommerce can be much more valuable than “normal” Ecommerce.
It provides you with many more opportunities to optimize your Ecommerce site on different levels.
New Property or Migrations
There are two options if you have already implemented Ecommerce on your website.
You can either create a new property and enable Enhanced Ecommerce for the new property. Or choose to migrate the Ecommerce plug-in to the Enhanced Ecommerce plug-in.
Your historical transactional data will not be affected if you choose to migrate to the new plug-in version.
Main takeaways:
- Implement Ecommerce is a must if you are running a shop.
- Go for Enhanced Ecommerce if you have the technical knowledge or can afford to hire a consultant.
- Don’t worry about losing historical data if you migrate from Ecommerce to Enhanced Ecommerce. The data will remain.
23. Segments
Segmentation is the key to actionable insights.
I recommend everyone to get at least a basic understanding about segmentation in Google Analytics.
You will get a lot more out of your data if you become more proficient at visitor segmentation.
This year I already wrote two in-depth posts on segmentation:
- In-depth overview of Google Analytics segments
- 20 Ecommerce segments to improve your customer insights
Google Analytics allows you to set up segments via the admin or reporting interface.
In the admin interface there are two options:
- Create new segments by yourself
- Import from gallery
I don’t use the “import from gallery” functionality myself.
If you decide to do, make sure to only import segments that are highly rated and/or from very prominent people in the field.
Reporting Interface
I prefer to create segments directly in the reporting interface.
Simply because I can evaluate my segment (does it work correctly?) before saving it.
Main takeaways:
- Invest some time to learn the basic of segmentation and Google Analytics segments.
- You can create segments in the admin and reporting interface.
- The reporting interface might be more appropriate as you can directly evaluate them.
- Import segments via the admin interface, but only those that suit your business and have a good rating.
- Share segments with your team members.
24. Annotations
Annotations are a great help in keeping track of changes that might impact your traffic data.
In the admin interface there is a link to annotations (located under personal tools & assets).
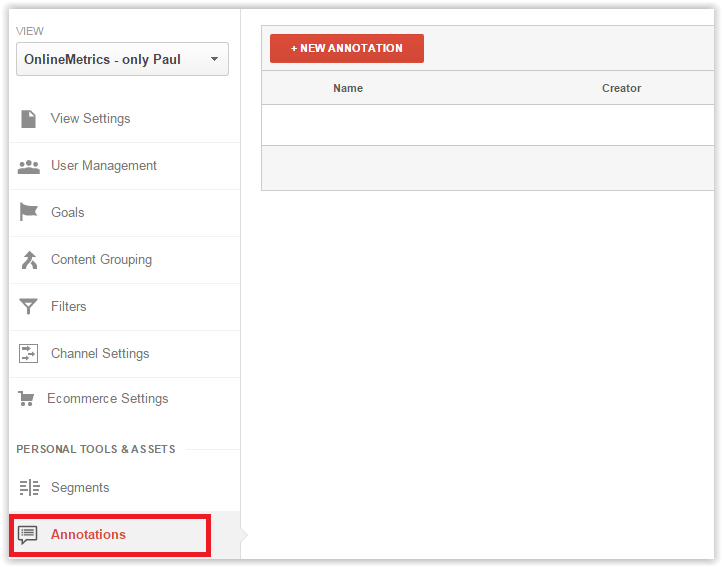 Via the “new annotation” link you can add a new annotation.
One big advantage of adding annotations via the admin interface is that you can add them for future events. This is very useful for all the future activities that are already planned. This is not possible if you add annotations via the reporting interface.
Please keep in mind that deleting annotations means deleting them for every user that has access to the view.
You can keep an annotation private or share it with others that have access to the same view.
Most often I recommend to share your annotations with others.
Some examples of when annotations might come in handy:
- Offline campaigns
- Weather extremes
- Competitor activity
- Developments in your industry
- Tracking issues
- Other changes that impact one or more of your metrics
Main takeaways:
- Annotations are very handy to keep track of external influences on your data.
- Add future annotations for already known future events.
- Use “stars” to emphasize the most impactful events.
Read this article for an in-depth overview on how to work with annotations.
25. Attribution Models
Google Analytics reports and conversion stats are based on a last-click attribution model.
It means that the “final” channel that directed a visitor to your site before she actually converted gets the credit for conversion.
But what if you like to distribute the credits in a different way? That’s when attribution models come into play.
You have the option to either import an existing model or define one by yourself.
First of all, there is no good or wrong model. It is your truth.
Attribution modelling is a feature for advanced users. Ignore this option if you are just starting out with Google Analytics.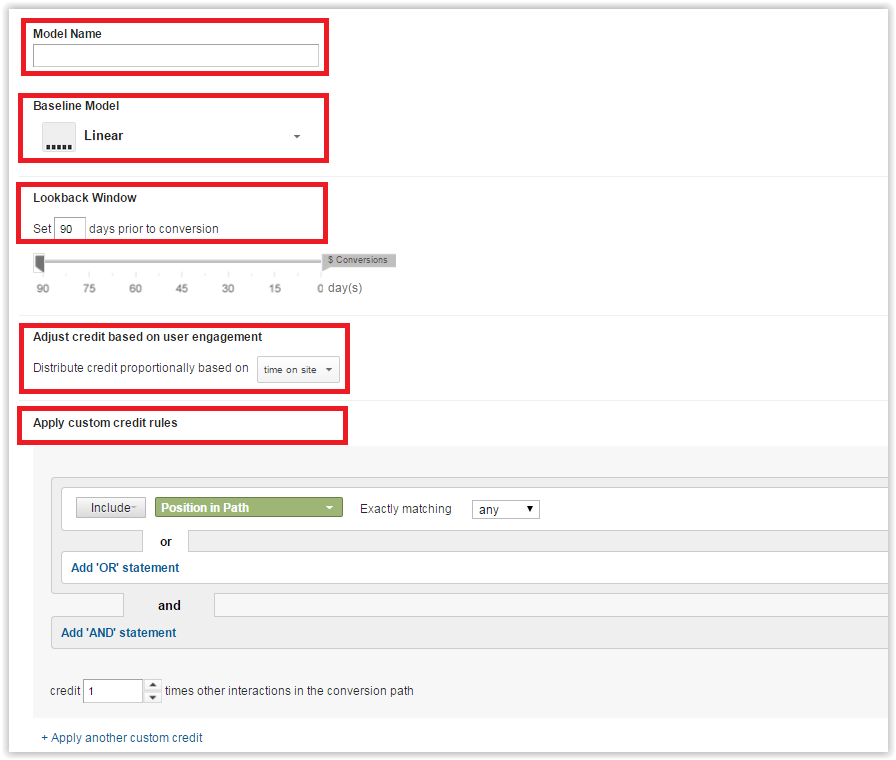 1. Model Name
In the first field you need to fill in a name for your model. It is a best practice to use a name that is easily recognized by you and others that have access to this attribution model.
2. Baseline Model
Google Analytics has five default models:
- Linear (equal distribution of credits among touchpoints)
- First interaction (all credits go to the first touchpoint)
- Last interaction (all credits go to the last touchpoint)
- Time decay (relatively more credits are given to touchpoints that are close to conversion)
- Position based (first and last touchpoint get the credits)
You have to choose a baseline model upon which you build your attribution model.
3. Lookback Window
You can select a lookback window between 1 and 90 days. Let’s assume you set your lookback window at 30 days.
 In a first interaction model “Social Network” gets all the credits. The visitor originally came via “Organic Search” but that interaction happened not within the lookback window of 30 days.
I recommend to play around with these lookback windows and see what it does to your conversion date distribution.
4. Credit Based on User Engagement
There is an option to distribute credits proportionally based on page depth or time on site.
Give it a try if user engagement – in these terms – is something that matters to your business.
Example:
John visits OnlineMetrics on Monday (organic) and reads three articles. Then he comes back on Wednesday (direct) reads another article and downloads my eBook.
What do you think? In my opinion the visit on Monday might have had a huge impact on his decision to convert on Wednesday.
5. Custom Credit Rules
The last setting provides a lot of flexibility. Currently you can apply 27 different dimensions and a few metrics to further customize your attribution model.
Based on one or more different statements you can give extra credits to certain channels.
Main takeaways:
- There is no perfect attribution model.
- It is your truth.
- Try out different attribution models and see how it fits your business and data.
- Start easy and slowly before you customize it further.
- Attribution models – based on new insights – evolve over time.
- Don’t look at the attributed conversion numbers every week.
26. Custom Channel Groupings
I have already mentioned the default and new channel groupings in an earlier chapter.
In your Google Analytics account there is also a section named Custom Channel Groupings.
There are quite few differences between the channel groupings you can set up:
 Click on image for larger view
You need to set up a custom channel grouping if you want to analyze your Multi-Channel Funnels on a deeper level.
For custom channel groupings you only need “Read & Analyze” permission. However, as you see they are not available in custom reports, dashboards or via the Core Reporting API.
Main takeaways:
- Your only option is to create custom channel groupings from the view admin panel or from directly within the Multi-Channel Funnel reports if you have only Read & Analyze rights to a view.
- If you have Edit access to the view, you can go to Channel Settings (Channel Grouping) in the admin to create a grouping for everyone who accesses the view. These groupings will not be accessible for the Multi-Channel Funnel reports.
- To allow all users to apply the same groupings to the Acquisition and Multi-Channel Funnel reports, one user can create custom channel groupings from the lower section of the view admin or directly from the Multi-Channel Funnel reports and then forward the shared links to other users.
- Changes to the default channel grouping in the Acquisition reports are not retroactive, so, as mentioned above, they may be more suitable to a new view, in which you could avoid inconsistencies with historical data.
- The channel grouping model is very flexible, so create groupings that focus on the most important traffic channels for your organization, department, or job role.
Recommended reading: Understanding Google Analytics Channel Groupings by Eric Fettman.
27. Private Channel Groupings
Private Channel Groupings are not so much different from Custom Channel Groupings.
However, they can only be applied to the Acquisition reports and not to the MCF reports.
Both Custom Channel Groupings as well as Private Channel Groupings have the following characteristics:
- Not available in custom reports, dashboards or Core Reporting API.
- Minimum required access level is Read & Analyze.
- They are only visible to you.
- They are shareable.
- Can be applied to data retroactively.
28. Custom Alerts
Custom Alerts are known as a very powerful feature. It could save you a lot of trouble if applied correctly.
- Navigate to your admin page.
- Select the view for which you like to set up your custom alert.
- Click on custom alerts (it is located under personal tools & assets).
- Click on new alert.
- Fill in the alert details.
You have many different options. Let’s look at each of them:
- Custom alerts for one or more views simultaneously.
- Period: day, week or month.
- Email trigger: email address for login and others if desired.
- Text message (United States only).
- Custom alert for all traffic or specific segment.
- Six different condition settings.
- Compare data for different periods: day, week, month and year.
LunaMetrics already put together a 55+ Custom Alerts list that I recommend to review.
Main takeaways:
- Custom alerts are a great help in monitoring technical performance (your tracking issues).
- Set them up to monitor any revenue or conversion rate drop.
- Campaign performance can be easily monitored as well.
- Make sure to set at least a few custom alerts to monitor your website’s performance.
- It can be a great help to monitor your data from a “distance”.
29. Scheduled Emails
Scheduled emails are easy to set up and I will guide you here on the process.
1. Go to the report (custom or default) you like to email
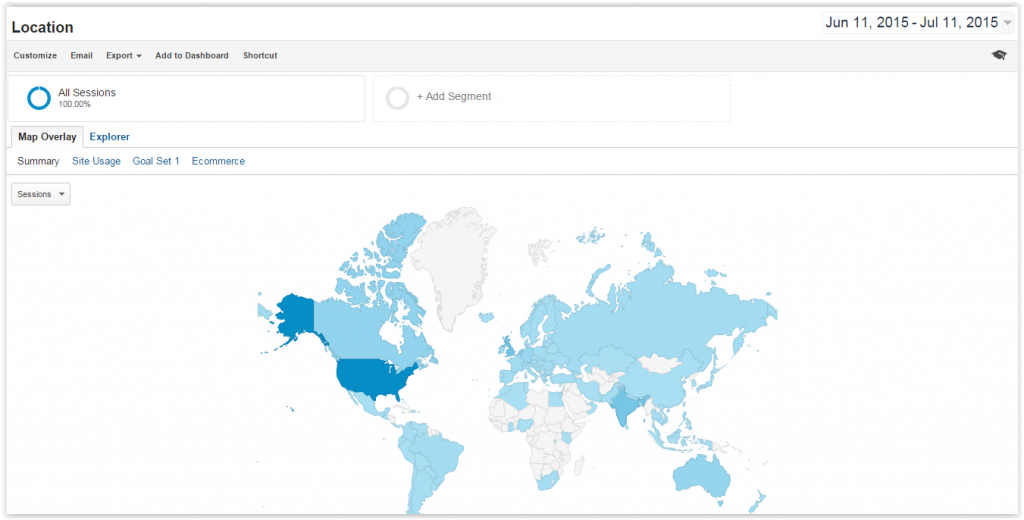 2. Click on the Email link (on top)
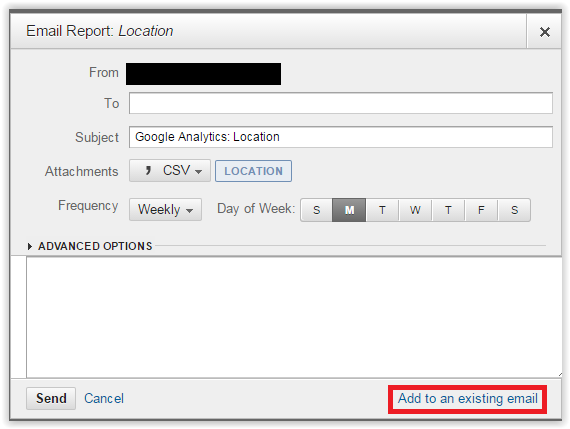 3. Fill in all details
You need to fill in the following fields:
- Email addresses you wish to send the report to
- Subject
- Format (CSV, TSV, TSV for Excel, Excel or PDF)
- Frequency (Once, Daily, Weekly (and day of week), Monthly (and day of month) or Quarterly)
- Email body: short descriptional message
- Optional: period (let it run for 1 to 12 months)
4. Head over to scheduled emails in admin section
 Here you have the option to review all your scheduled emails.
And – if desired – you can extend or delete a few of them.
Main takeaways:
- Set up scheduled emails with the most important metrics to key stakeholders.
- Don’t go overboard; a few targeted emails is most often more than enough.
- Review them on a monthly basis and make changes if needed.
30. Shortcuts
Google Analytics has another very powerful feature named shortcuts.
Via the admin section you can view, rename and delete shortcuts.
You need to go to the reporting interview to create a new shortcut.
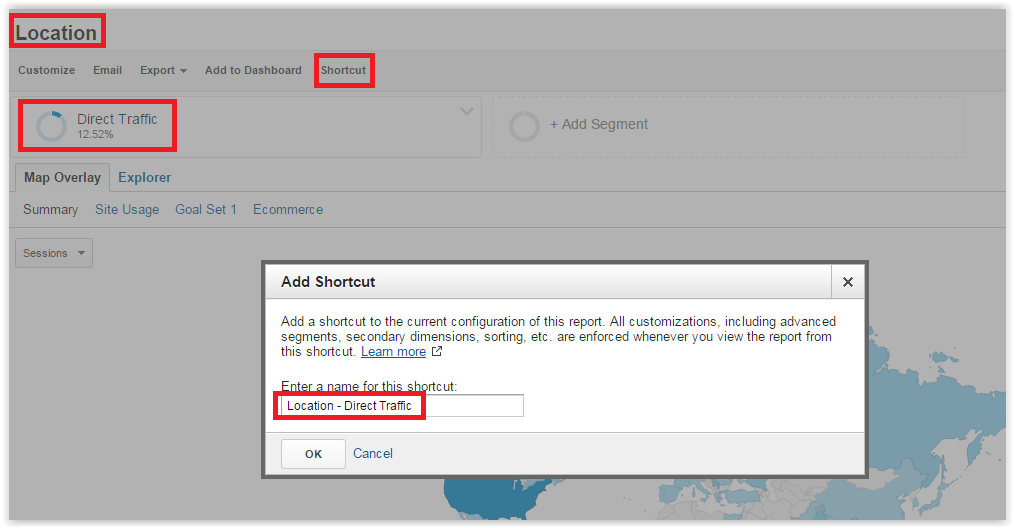 Steps to Follow
- Pre-select the report settings you want to include (e.g. segment)
- Click on Shortcut link in navigation bar
- Enter a name for this shortcut
- Hit “Ok”
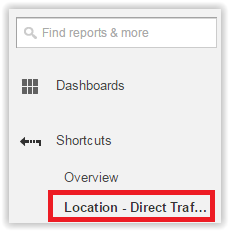 As you see, it is now visible on the left side.
You can also find it through a “Find reports & more” search.
Reviewing your shortcuts is easy via the admin interface: I wrote a 4000+ words guest post on Google Analytics tips and shortcuts on KISSmetrics. Don’t forget to check it out as well!
Main takeaways:
- Directly configure your shortcuts in the reporting interface.
- Review them in the admin interface.
- Highly recommended to use as quick links to your most viewed (custom) reports.
- Huge timesaver for data analysis / sharing information.
31. Share Assets
Share Assets is an incredibly helpful feature in any organization where different people have access to the same Google Analytics account and views.
It allows you to share all the assets you have created to customize your data analysis:
- Custom Segments
- Goals
- Dashboards
- Custom Channel Groupings
- Custom Attribution Models
- Custom Reports
How to share assets with your colleagues?
- Select the admin tab and navigate to the view from which you wish to share assets.
- In the view column, click Share Assets (last link).
- Select the assets you wish to share. Share all assets by clicking the checkbox on top.
- Click Share.
- Select the sharing type, either Share template link or Share in Solutions Gallery.
- Click Share.
Main takeaways:
- Sharing assets help you to easily distribute your favorite settings, reports etc. with others.
- Sharing is good, but don’t forget to further educate other Google Analytics users if needed.
- Be careful with what you share (not everything might be useful to others).
It’s incredible if you have finished my complete guide on setting up and configuring your Google Analytics account.
I am sure this set up guide helps you to get more out of Google Analytics. Your data collection process and insights should get an enormous boost!
What process do you follow when setting up a Google Analytics account?
I am glad to hear any comments or feedback. Share it with others if you think they might benefit from reading it as well.
One last thing... Make sure to get my automated Google Analytics 4 Audit Tool. It contains 30 key health checks on the GA4 Setup.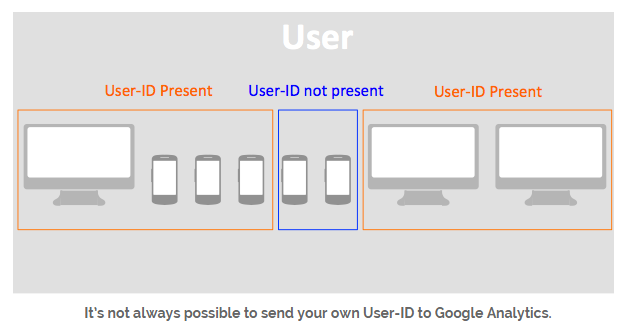
Really amazing article about Google Analytics. Probebly the best guide that I saw until today. Congrats and thanks for gathering so much information in only one spot!
Regards,
Nico
Hi Nicolas,
I am glad you like it. Hope this guide helps you to get more out of Google Analytics.
And I will try to publish more in-depth guides (on several topics) in the upcoming months.
Best,
Paul
Question about property settings. If we are using Doubleclik for Publishers, which supplies its own reporting, is it dangerous or superfluous to set up Demographics & Interests Reports and its dependencies?
Hi Greg,
I would recommend to still set it up to get maximum insights. If for whatever reason you don’t see enough extra value, you can always switch back.
Best,
Paul
my web developer has set up our website (Property) with google analytics and he has then given us access through our google account. Does this mean he is now seen by Google as the owner of our Property (website) in Googles eyes and can he therefore refuse to give us access to the Property / analytics anytime in the future if he so decides ?
I strongly recommend setting up a unique account for your website by yourself. Never let a web developer set up a property under their account. You can let the developer implement the Google Analytics or Google Tag Manager code (preferred). Technically yes, you don’t want your web developer to have “manage users” access with regards to your data.
Still relevant in 2019!
Thank you for this very detailed article, I’ve turned it into my own checklist when working with a new Analytics account.
Great to hear that Mathieu – true, a few things have changed, but it is mostly still very relevant!