Setting up a GA4 test property is a must if you don’t want to pollute your live website data with testing data. In this article, you will learn the key steps to get this properly set up.
Many companies get this wrong. They add the same measurement ID (relating to one unique property) on a wide variety of websites, including dev / testing environments. And this is really a bad thing.
You have a ton of options to review all domains that receive traffic within the same GA4 property.
One option is shown below.
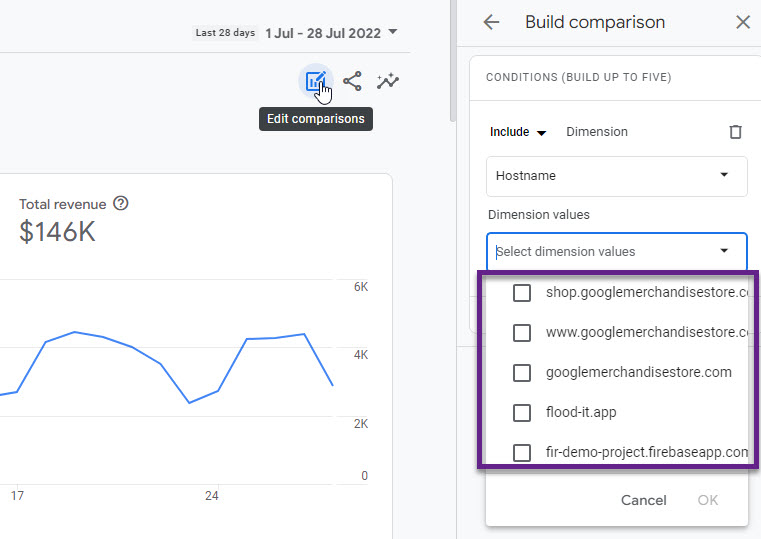
We will explore this topic in all detail and I will share best practices along the way.
Table of Contents
- What is a GA4 Test Property
- Why You Need a Test Property
- How to Set up a Test Property in GA4
- GTM in The Implementation Process
- Common Implementation Mistakes
- Concluding Thoughts
Ok, let’s dive right in!
What is a GA4 Test Property
As the name already implies, a GA4 test property is a property that a company uses for testing purposes.
Within this property, you only collect testing data, i.e. from preview, dev or development instances.
This is a crucial element in the GA4 implementation process. In this case, any mistakes in the test phase won’t pollute the data collection in your live property.
Why You Need a Test Property
In the last years, I have seen dozens of GA4 setups with major flaws.
Every company should prepare and test the GA4 implementation first on a preview or testing domain and not directly push everything live.
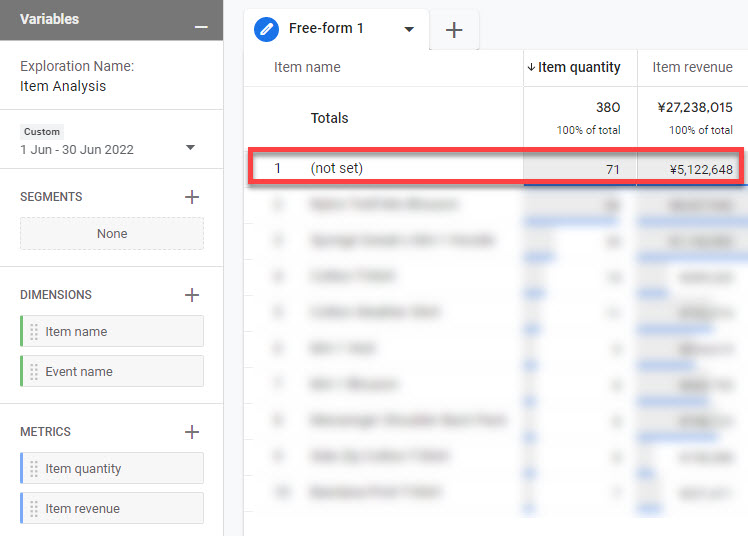 20% of all item revenue is not correctly attributed (not set). This is something I have spotted very regularly in new implementations.
GA4 is complex and many things can go wrong. All configuration settings and implementation decisions can potentially ruin your data.
Thus, in my opinion, the best strategy is to create a GA4 test property with the data separate from your live GA4 environment/property.
It’s perfectly fine to add them to the same Google Analytics account.
Client’s comment: “But, in GA4 you can set up two different data streams within the same property?”
Yes, but creating a separate data stream still pollutes your GA4 property at the core.
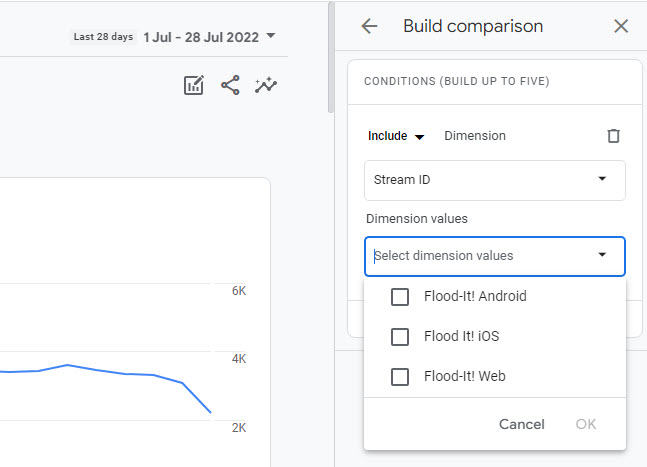
And, you need to use filters, comparison or segments to split even the most basic data. This can still lead to a variety of issues and lots of extra work.
Tip: multiple data streams are very useful if you have multiple related live websites (Google example below).
 In the legacy Universal Analytics / GA3 version it’s debatable. You can use filters to create separate reporting views and in- or exclude specific hostnames. But still, a separate GA3 testing property is recommended. By doing this, you don’t mix up property level settings from testing and live domains.
How to Set up a Test Property in GA4
Creating a test property in GA4 works in a similar way as if you create a live GA4 property.
Step 1: Navigate to the Admin section and select ‘Create Property’.
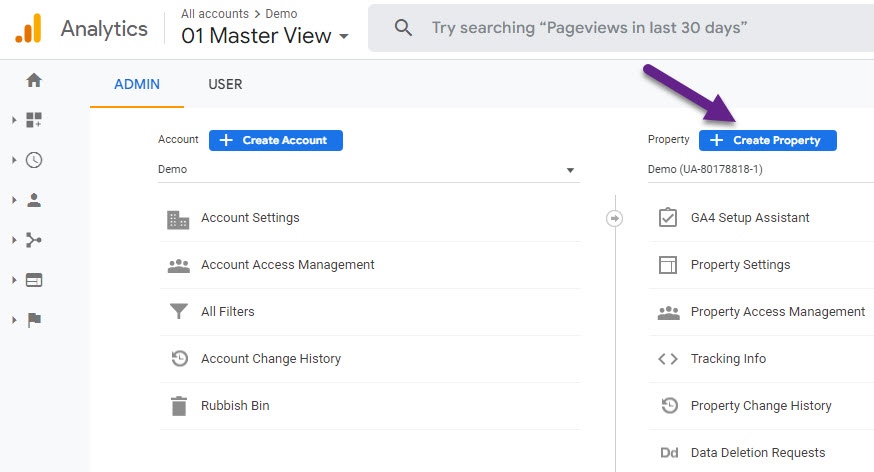
Step 2: Input initial property details and click ‘Next’.
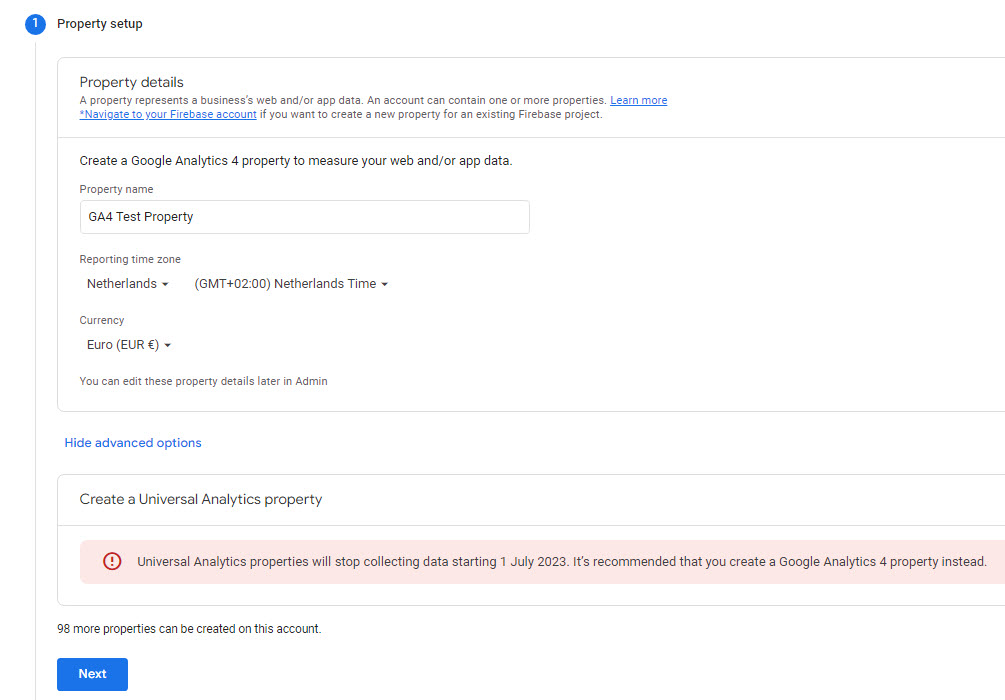
You are creating this property for GA4 testing purposes so there is no need to create a Universal Analytics property in addition. Also, from 1 July 2023 UA will stop collecting data (1 July 2024 if you are on GA 360).
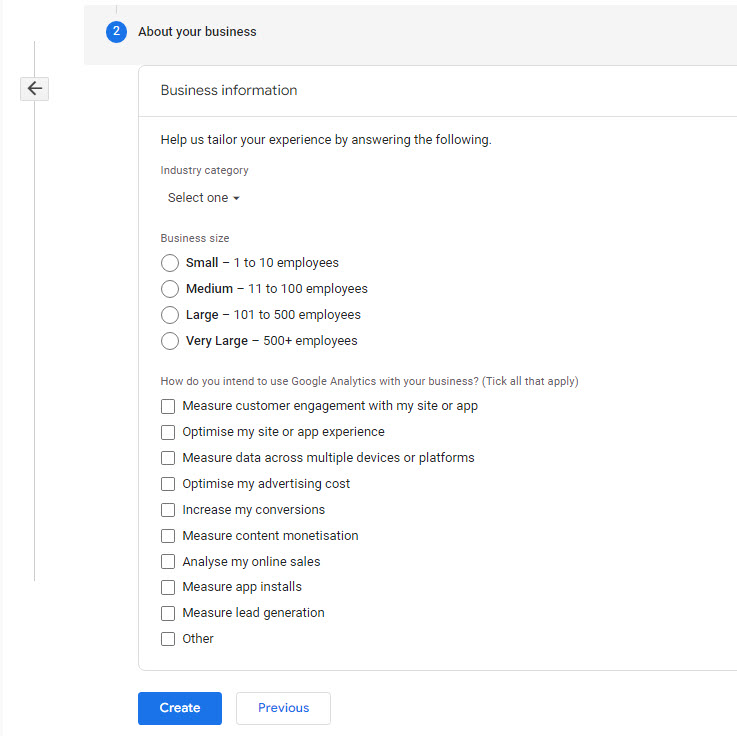
Step 3: Fill in business information (optional) and click ‘Create’.
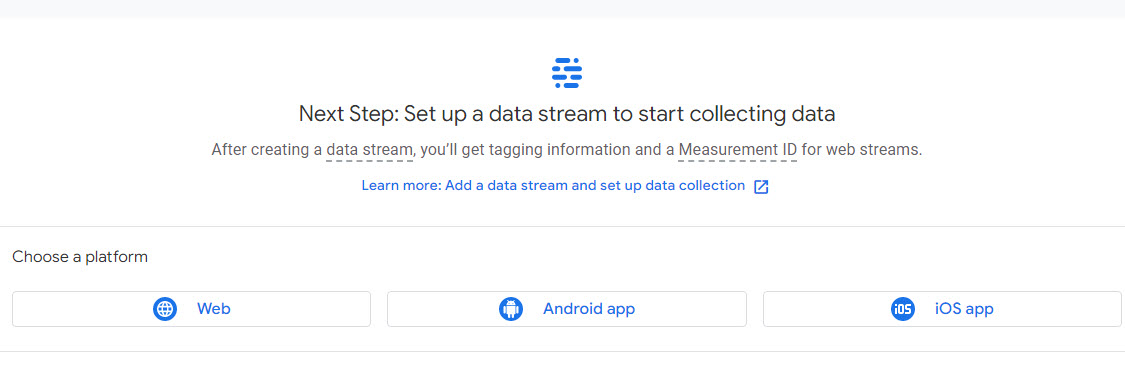
 Step 4: Choose data stream type (‘Web’ in most cases).
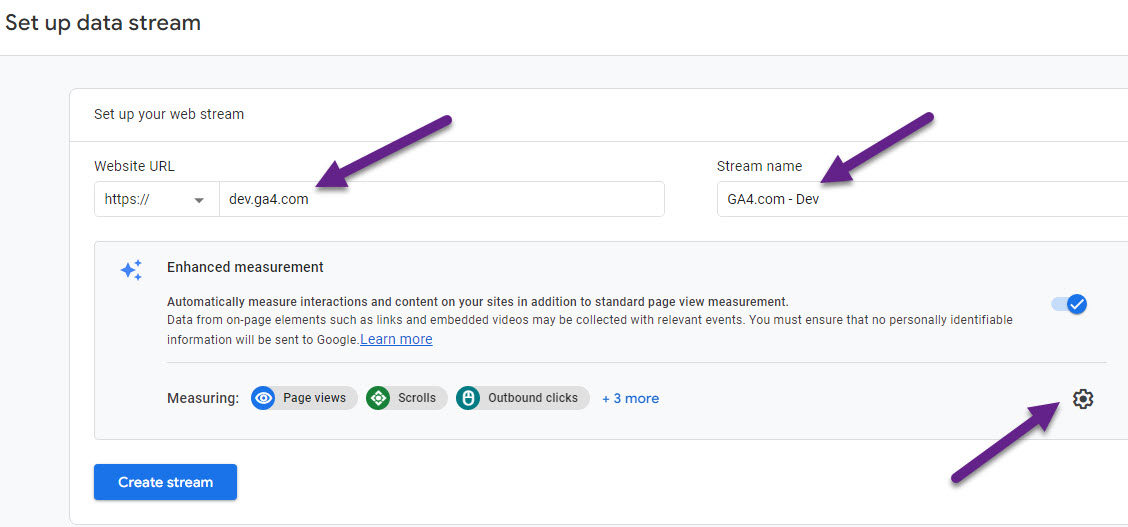
Step 5: Create data stream after reviewing Enhanced Measurement settings.
A few notes:
- You can modify the Website URL and stream name at a later stage.
- The website URL doesn’t affect the GA4 data collection if incorrectly specified.
- Read these Enhanced measurement tips if you are unsure.
Step 6: Copy the measurement ID to your clipboard – you will need it later in the GTM setup.
Tip: refresh the page if you get a blank screen after step 5 (and click on button ‘Create stream’).
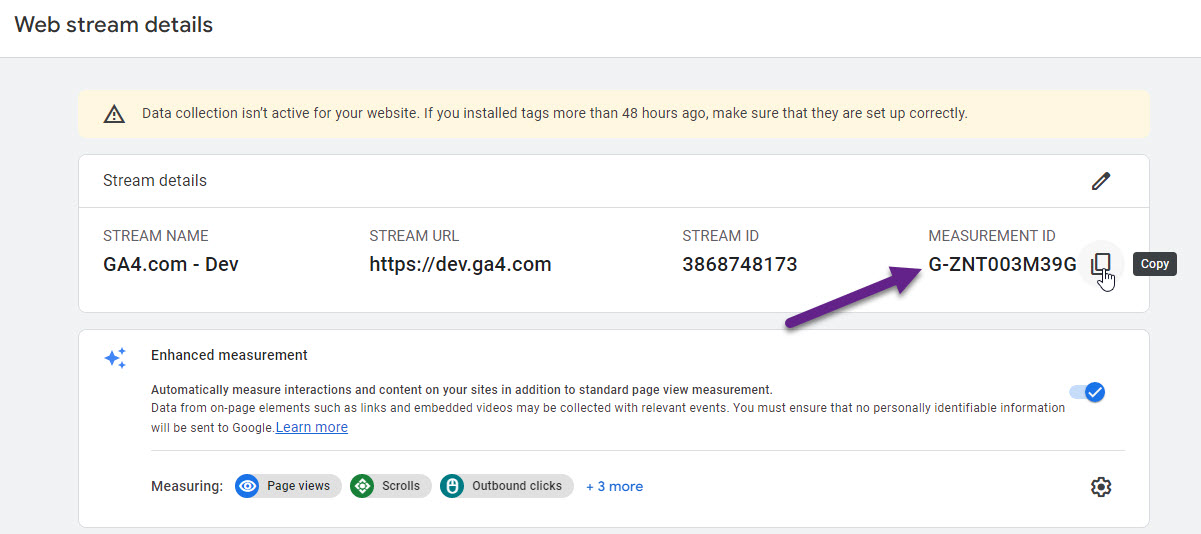
Congratulations, your GA4 test property and the basic settings are now ready.
Note: here you can find detailed information on all the property settings in GA4.
Next, we need to ensure that the data from your testing domain is actually sent to this property. You can learn how to do this later in this article.
GTM in The Implementation Process
Most companies leverage GTM when implementing GA4 on their website or app.
In GTM, I recommend to choose one of the two options below:
- One GTM container for both live and dev GA4 property, but with different ‘environments’.
- Two GTM containers, one for each website.
Setting it up via two GTM containers is straightforward.
Using one GTM container might sound a bit more complicated, but in general it is more efficient. This as you can basically create every GA4 related Tag just one time and pass the data to the correct GA4 property based on {{Page Hostname}}
Here is how you can approach it if you have one GTM container.
A Lookup Table is the extra part that comes in handy here.
Step 1: Create a Lookup Table based on the {{Page Hostname}} variable and measurement IDs of both websites.
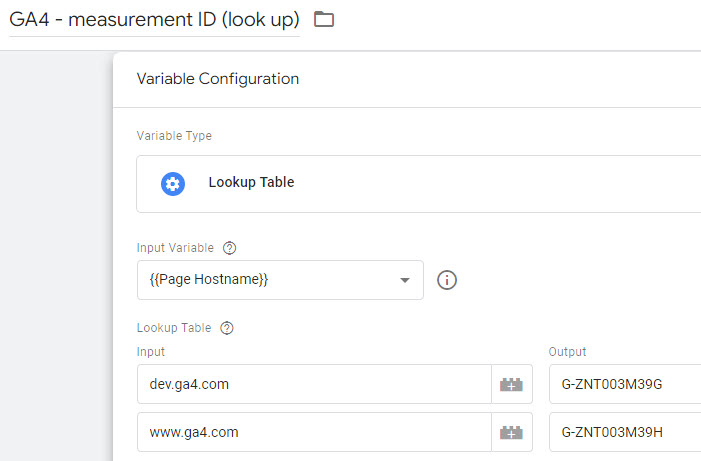
Step 2: Re-use this variable in your GA4 Config Tag.
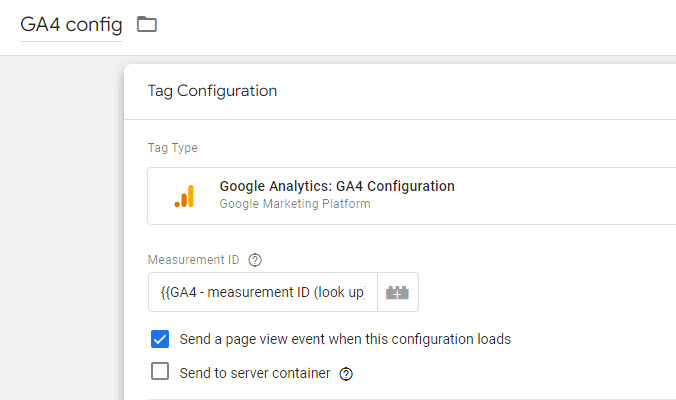
The great thing is that your GA4 Event Tags implementation automatically connects to the GA4 config Tag with all specified rules in place.
Very importantly, first do thorough testing on your dev website and GA4 test property before moving the implementation to production.
You can verify your GA4 test data requests in a variety of ways. Here are some suggestions:
- DebugView in GA4.
- Adswerve – dataLayer Inspector+.
- GA/GTM Debugger.
- Chrome DevTools (console and network tab).
Common Implementation Mistakes
Many things can go wrong. Here is a list of eight common mistakes in relation to implementation testing and a GA4 test property:
- There is no GA4 test property and/or implementation at all. The organization implements everything directly in production.
- There is a test and live evironment, but testing on the dev site is minimal.
- Implementation of the dev measurement ID on the live site.
- Implementation of the live measurement ID on the dev site.
- Implementation of the dev and/or live measurement ID on the wrong website // i.e. agency managing multiple clients
- Wrong patch when deploying GA4 implementation from dev to live.
- The implementation of new features is not supported with any testing.
- The company doesn’t carry out any tests on the live website.
I am sure there are more scenarios, but these tend to be most common on my side in the last year.
Concluding Thoughts
Hopefully, I have convinced you that a GA4 test property is a must for every organization.
You take a big risk if you decide to implement GA4 directly on production without a proper testing procedure. Your data and analysis will greatly suffer if you pollute your GA4 live property with either bad data or test data in general.
This post will protect you against common implementation mistakes as well as provides a strategic approach and setup in relation to GA4 testing.
This is it from my side. I am very curious to hear about your thoughts and experience with GA4 testing. Just leave your comment below and start the discussion!
One last thing... Make sure to get my automated Google Analytics 4 Audit Tool. It contains 30 key health checks on the GA4 Setup.
Hi Paul,
thanks for sharing this and explaining the setup of an additional property and why that is useful. I just tried to replicate the setup in one of my GA4 accounts. But since the UI changed this year, this option for adding a property is not available any longer – or I am not able to find it. Have you checked where it is located now, since the navigation switched?
I think it could be beneficial for readers of this article if you would provide an update in context of the changed interface in GA4 Admin area.
Cheers!
Good point and still on my list to update. In the top left corner (admin section) next to the Home button, you can find a ‘+ Create’ button (for creating a new property and/or account).