Bounce rate is an important metric that gives an indication of the interaction of your visitors on your website.
If someone bounces on your website, it means this person has only visited one page and didn’t trigger an event (measured interaction) during the session.
 Like with almost every other metric, I recommend to focus on individual pages instead of your entire website.
You can’t optimize your entire website in one time, right?
After some experimentation and a few discussions with other like-minded friends, I like to explain more about Google Analytics and implementing adjusted bounce rate in GTM.
The Reason Behind Adjusted Bounce Rate
The standard bounce rate in Google Analytics might be a bit flawed.
Just take a look at the following scenario:
- Vanessa likes to know more about “bounce rates”
- She searches in Google on “how to adjust bounce rate calculation”
- For this longtail phrase she sees my post at #1 in the SERPs
- She clicks on the first organic link and arrives on this page
- She thinks it is quite a good fit and starts reading
- After 5 minutes she leaves my website with no other measured interaction
On default, Google Analytics will calculate this as a bounce. Would you agree on that?
In my opinion, since she doesn’t bounce back to the SERPs and actually spends minutes on my website, this is quite arbitrary.
That’s why I advice to consider measuring adjusted bounce rate figures.
Blogs and Media Sites
Especially on blogs and media sites – where content consumption is key – you should think about how bounce rate numbers are calculated.
It is definitely worth it to consider taking time on the landing page for bouncers into consideration when calculating bounce rate measures.
Nowadays, almost every online business has a blog for different reasons.
So, it might be a good practice for you as well!
5 Steps to Implement Adjusted Bounce Rate
Implementing adjusted bounce rate can be done in minutes.
However, I definitely recommend to take some extra time to get things right from the start!
1. Set Up a New Property in Google Analytics
First of all, you don’t want to ruin your Google Analytics stats.
So before applying this “new” bounce rate to your main web property, I advice to set up a new property in Google Analytics.
This is very easy as you can see below (via the admin interface):
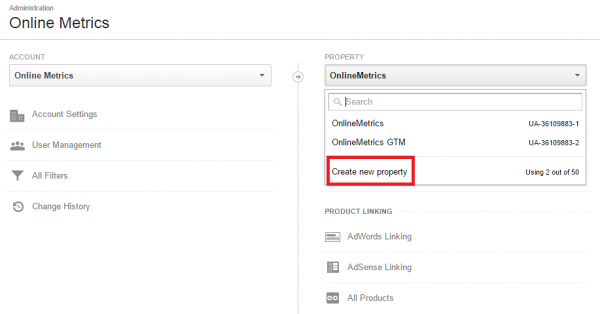 In my case I am currently running two Analytics trackers:
- UA-36109883-1 (Classic Google Analytics)
- UA-36109883-2 (Universal Analytics via Google Tag Manager)
I have created the second property to prepare for my migration to Universal Analytics and to test with adjusted bounce rate measurement. This way I keep my first property “clean”.
And when I am ready, I can remove the old tracking code and change the second property to UA-36109883-1.
Note: steps 2 to 4 are recorded in version 1 of Google Tag Manager. However, you can easily apply these steps in version 2 as well. At the time of writing this version is still in beta.
Note 2: I assume you have some basic knowledge of GTM or have access to a webdeveloper who is willing to assist you.
2. Create a Macro in GTM
I recommend to create a macro for your tracking code that belongs to your new property in Google Analytics. It makes it easier to re-use your code in different tags.
This is how the macro looks like in GTM:
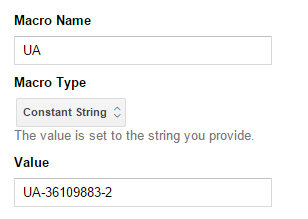 Now you can move on with the actual steps to create your new bounce rate metric (calculation).
3. Create Two Rules in GTM
As mentioned before, I have chosen to create a time-based adjusted bounce rate measure.
You could also choose to involve scrolldepth or anything else that you feel is appropriate to take into account when calculating bounce rate measures.
Now you have to decide whether you like to trigger an event on all of your webpages or just a couple (e.g. your blog subdirectory).
In my case I have experimented with adjusting my bounce rate on all of my webpages.
Make sure to create the following rules (adjust rule one if you want to fire the tag on a subset of your webpages):
 4. Create Two Tags in GTM
Now that you have your rules set up, it is time to create the tags to get things to work.
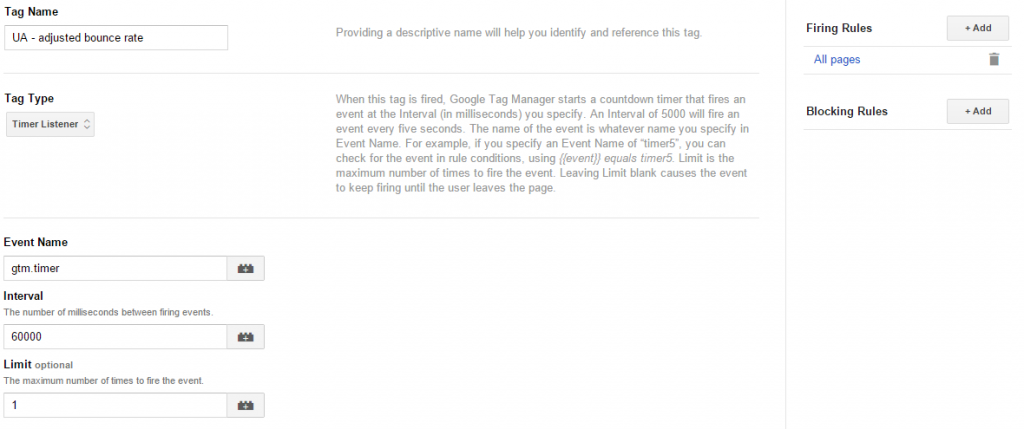
Here is the first tag that you need to create:
-
- gtm.timer is active on all pages
- it fires an event after 60 seconds (one minute)
- it doesn’t keep on firing events (limited to 1)
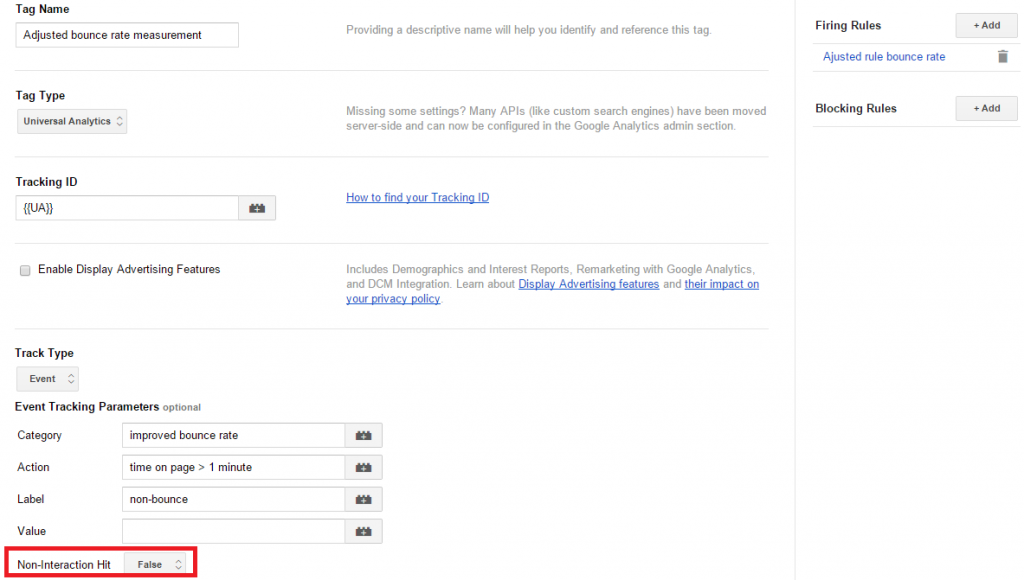
And here is the second tag:
A few things to note:
- I can use {{UA}} because of the UA macro that I have created
- I use a couple of event tracking parameters to track this event in Google Analytics
- I set Non-Interaction Hit to False to make sure this is tracked as an interaction (positive influence on bounce rate; it lowers the bounce rate)
Note: if you first like to test without influencing your bounce rate you should set Non-Interaction Hit to true.
You can still record this event and – if you are smart – make the adjusted bounce rate calculations by yourself.
Now it’s time to get your new container version live!
5. Check Your Real-Time Reporting
For many things the real-time reports in Google Analytics really comes in handy.
Especially when implementing something new I recommend to use this powerful feature and set up a different view (with an include filter on your IP address) for testing purposes:
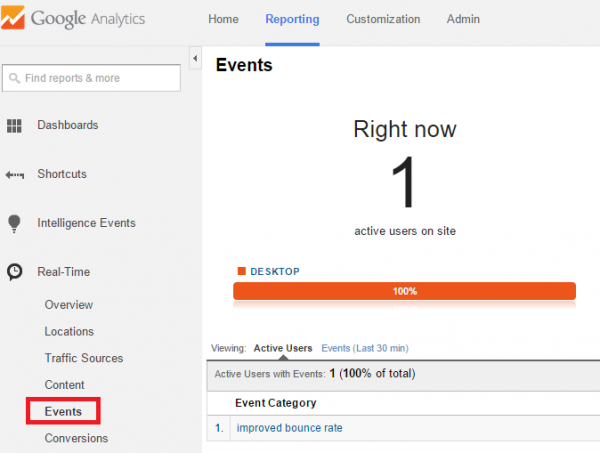 Great, you have just successfully implemented your improved bounce rate.
Final Thoughts
- Experiment with what works for you (vary time to trigger (e.g. one to five minutes) and keep track of the effect on your bounce rate)
- Make a clear decision to implement this on a few pages or your entire website (the latter is easier)
- Use these new insights to optimize your website and (future) content
- Target people that only view one page but stay longer than x minutes with a special offer; you don’t have to lose them on the landing page
- Take your time to set an appropriate adjusted bounce rate for your website and business
Thank you for staying with me to the end.
What’s your opinion on bounce rates?
Do you use this metric for optimization purposes and how?
I am glad to read and respond to your comments.
One last thing... Make sure to get my automated Google Analytics 4 Audit Tool. It contains 30 key health checks on the GA4 Setup.
hi .I think so a 40-50 % bounce rate is acceptably a good bounce rate for a site. Have below 40 % and that’s excellent! and even the 60-70 % interval is, although not good, it’s not “the end of the World”, but above 75 %, above 80 % is terrible.Anything above 80-85 % leaves a terribly negative footprint and is a bad signal in the SERPs.
Hi,
I know from Webtrekk, that every bounce has a standard time spent on the website (30sec) due to the fact that the information is handed over on the next site. how did you manage to get the correct time spent?
Greetings
Tobias, there is no right or wrong for the time value that you apply to the adjusted bounce rate metric. I ran experiences with 15 seconds, 30 seconds, one minute etc. to find out the sweet spot of what delivered the greatest insights in how my content/website performs.
I have setup this using tag manager however for one of my site bounce rate is still HIGH.
I don’t know if its possible to delete and start afresh?
What do you exactly want to delete? Yes, you can start a new reporting view with fresh data. Not sure what you are trying to accomplish.